

Before diving into Qubes, I would like to show you the table of contents.
Qubes OS is a free and open-source,
security-oriented operating system for single-user desktop computing. Qubes OS
leverages Xen-based
virtualization to allow for the creation and
management of isolated compartments called qubes.
These qubes, which are implemented
as virtual machines (VMs), have
specific:·
• Purposes: with a predefined set of one or
many isolated applications, for personal or professional projects, to manage
the network stack, the firewall, or to
fulfill other user-defined purposes.·
• Natures: full-fledged or stripped-down virtual
machines based on popular operating systems, such as Fedora, Debian, and Windows.·
• Levels of trust: from complete to
non-existent. All windows are displayed in a unified desktop environment
with unforgeable colored window
borders so that different security levels are easily identifiable.
Strong Isolation: Isolate different pieces of
software as if they were installed on separate physical machines using PV or HVM virtualization
techniques.
Template System: Use AppVMs to
share a root file system without sacrificing security using the
innovative Template system.
Multiple Operating Systems: Use multiple operating systems at the
same time, including Fedora, Debian, and Windows.
DisposableVMs: Create DisposableVMs on
the fly that self-destruct when shut down.
Whonix Integration: Run Tor securely
system-wide using Whonix with Qubes.
Device Isolation: Secure device handling through
isolation of network cards and USB controllers.
Split GPG: Utilize Split GPG to
keep your private keys safe.
U2F Proxy: Operate Qubes U2F proxy to use
your two-factor authentication devices without exposing your web browser to the
full USB stack.
Open-Source: Users are free to use, copy, and
modify Qubes OS.
Throughout our lives, we engage in
various activities, such as going to school, working, voting, taking care of
our families, and visiting with friends. These activities are spatially and
temporally bound: They happen in isolation from one another, in their own
compartments, which often represent an essential safeguard, as in the case of
voting.
In our digital lives, the situation
is quite different: All of our activities typically happen on a single device.
This causes us to worry about whether it's safe to click on a link or install
an app, since being hacked imperils our entire digital existence.
Qubes eliminates this concern by
allowing us to divide a device into many compartments, much as we divide a
physical building into many rooms. Better yet, it allows us to create new
compartments whenever we need them, and it gives us sophisticated tools for
securely managing our activities and data across these compartments.
Many of us are initially surprised
to learn that our devices do not support the kind of secure
compartmentalization that our lives demand, and we're disappointed that
software vendors rely on generic defenses that repeatedly succumb to new
attacks.
In building Qubes, our working
assumption is that all software contains bugs. Not only that, but in their
stampeding rush to meet deadlines, the world's stressed-out software developers
are pumping out new code at a staggering rate — far faster than the
comparatively smaller population of security experts could ever hope to analyze
it for vulnerabilities, much less fix everything. Rather than pretend that we
can prevent these inevitable vulnerabilities from being exploited, we've
designed Qubes under the assumption that they will be
exploited. It's only a matter of time until the next zero-day attack.
Qubes takes an eminently practical approach: confine, control, and contain the
damage. It allows you to keep valuable data separate from risky activities,
preventing cross-contamination. This means you you can do everything on the
same physical computer without having to worry about a single successful
cyberattack taking down your entire digital life in one fell swoop. In fact,
Qubes has distinct
advantages over physical air gaps.
Qubes provides practical, usable security to
vulnerable and actively-targeted individuals, such as journalists, activists, whistleblowers,
and researchers. Qubes is designed with the understanding that people make
mistakes, and it allows you to protect yourself from your own mistakes. It's a
place where you can click on links, open attachments, plug in devices, and
install software free from worry. It's a place where you have
control over your software, not the other way around.
Qubes is also powerful.
Organizations like the Freedom of
the Press Foundation, Mullvad,
and Let's
Encrypt rely on Qubes as they build and maintain critical privacy
and security internet technologies that are in turn relied upon by countless
users around the world every day. Renowned security experts like
Edward Snowden, Daniel J, Bernstein, Micah Lee, Christopher Soghoian, Isis
Agora Lovecruft, Peter Todd, Bill Budington, and Kenn White use and recommend
Qubes.
Qubes is one of the few operating
systems that places the security of its users above all else. It is, and always
will be, free and open-source software, because the fundamental operating
system that constitutes the core infrastructure of our digital lives must be
free and open-source in order to be trustworthy.
Qubes OS has very
specific system requirements. Even on supported hardware, you must ensure
that IOMMU-based virtualization is activated in the BIOS. Without it, Qubes
OS won’t be able to enforce isolation. For Intel-based boards, this setting is
called Intel Virtualization for Directed I/O (Intel VT-d) and for AMD-based boards, it is
called AMD I/O Virtualization Technology (or simply AMD-Vi). This parameter
should be activated in your computer’s BIOS, alongside the standard
Virtualization (Intel VT-x)
and AMD Virtualization (AMD-V)
extensions. Along with these
settings you will also need to enable “Legacy Boot Mode”.
You can learn more
about your BIOS by going to the website of the manufacturer of your laptop. I
am not giving a detailed description about it because it differs from computer
to computer.
Note: Qubes OS
is not meant to be installed inside a virtual machine as a guest hypervisor. In
other words, nested virtualization is not supported. In order for a strict virtualization
to be enforced, Qubes OS needs to be able to manage the hardware directly.
1) USB/DVD : 8 GB+ (Installation Medium)
2) SSD/HDD/USB/DVD : 32 GB+ (Main Operating System)
Start by downloading a Qubes ISO.
You can
download a Qubes ISO from https://www.qubes-os.org/downloads/ .
Note:
Download the stable release because the beta release might contain bugs.
Warning: Any file you download from the internet could be malicious, even
if it appears to come from a trustworthy source.
You can verify the
authenticity of the file by using QuickHash.
Once the ISO has
been verified as authentic, you should flash it onto the installation medium (8GB+ device) of
your choice, such as a dual-layer DVD, a Blu-ray disc, or a USB drive.
You can
flash the ISO file using Balena Etcher.
Warning: All the data on the installation
medium will be erased.
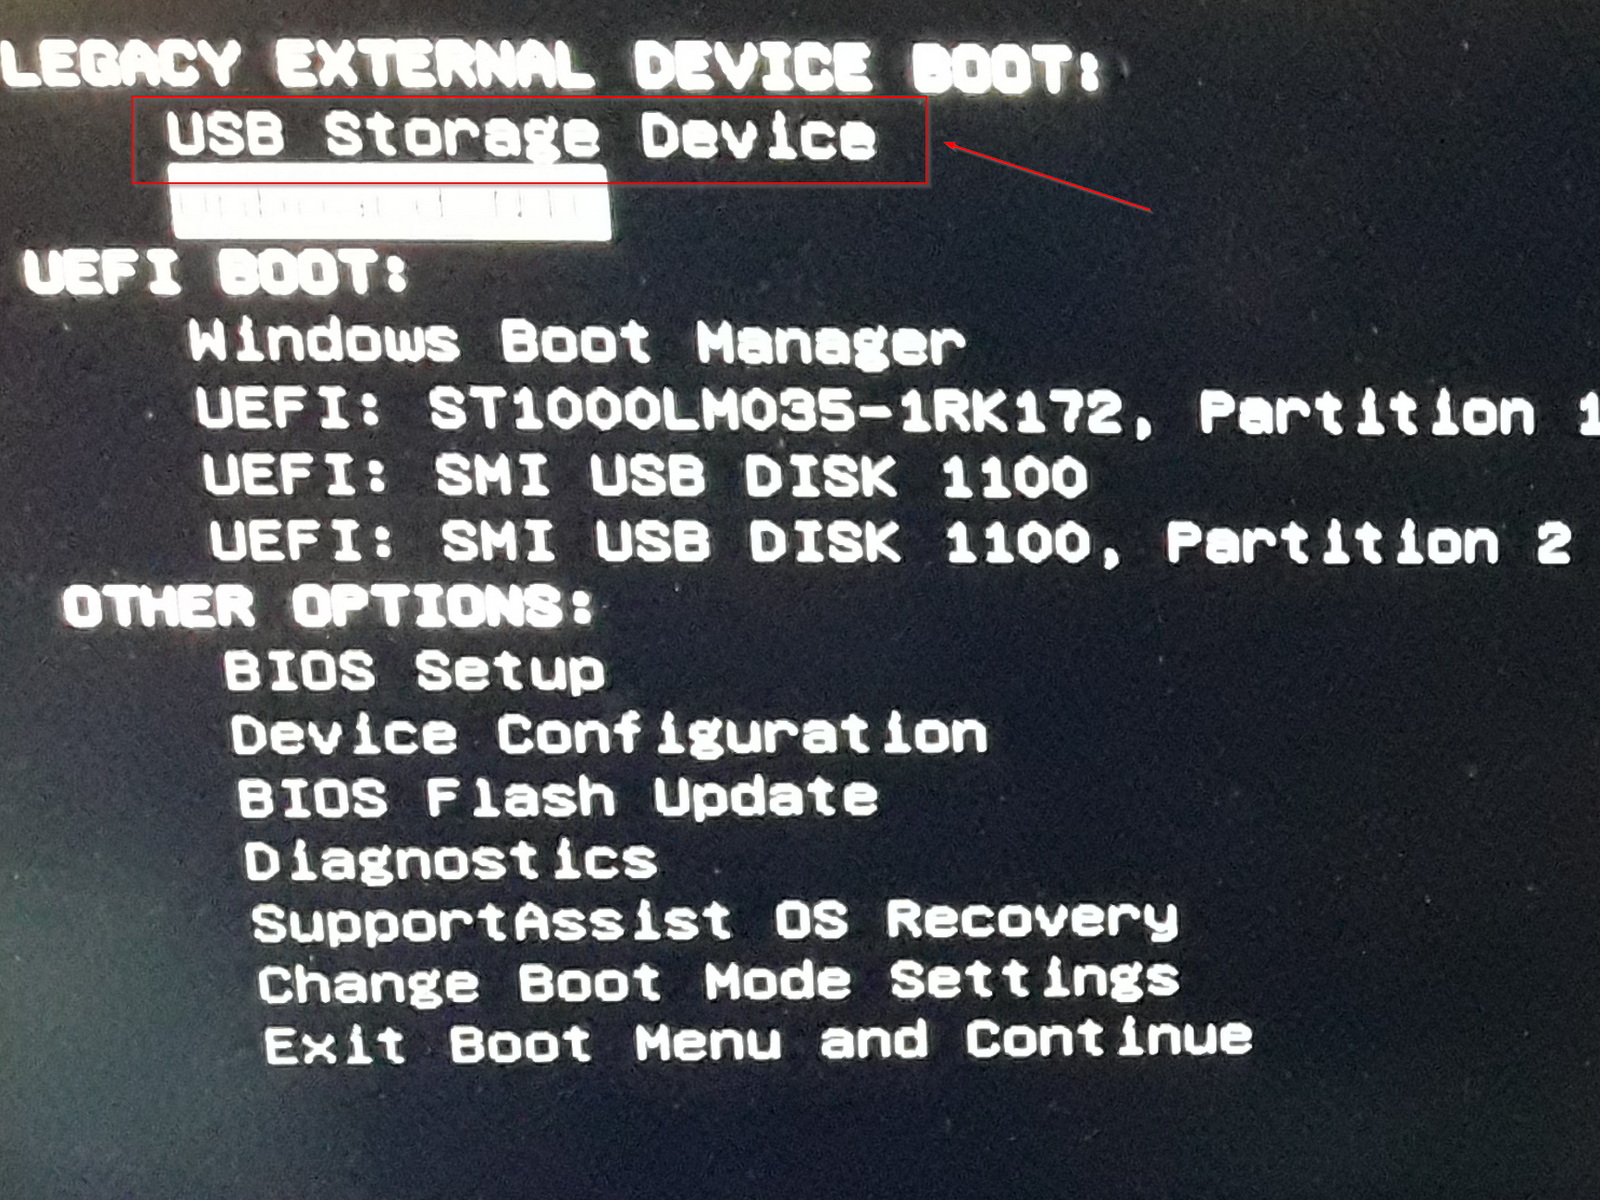
Just after you power on your
machine, make the Qubes installation medium available to the computer by inserting your
installation medium. Once the computer starts (not boots), keep pressing the
key which is used to open the boot menu of your PC, as usual you can find it on
the website of the manufacturer of the PC, because it differs from computer to
computer.
Once the boot menu opens, select
the installation medium, after selecting the installation medium, the boot
screen will appear.
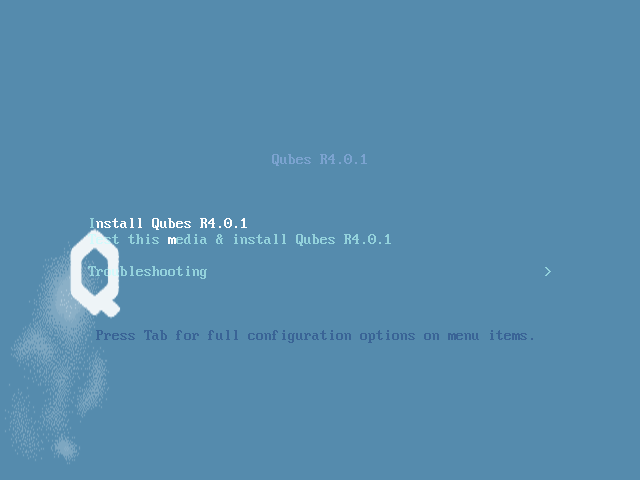
From here, you can navigate the
boot screen using the arrow keys on your keyboard.
You can choose one of three options:
• Install
Qubes OS
• Test
this media and install Qubes OS
• Troubleshooting
Select the option to test this
media and install Qubes OS.
If the boot screen does not appear,
there are several options to troubleshoot. First, try rebooting your computer.
If it still loads your currently installed operating system or does not detect
your installation medium, make sure the boot order is set up appropriately. You
can contact the manufacturer of your PC for learning more about the boot order,
as I said that the boot menu totally depends on the manufacturer.
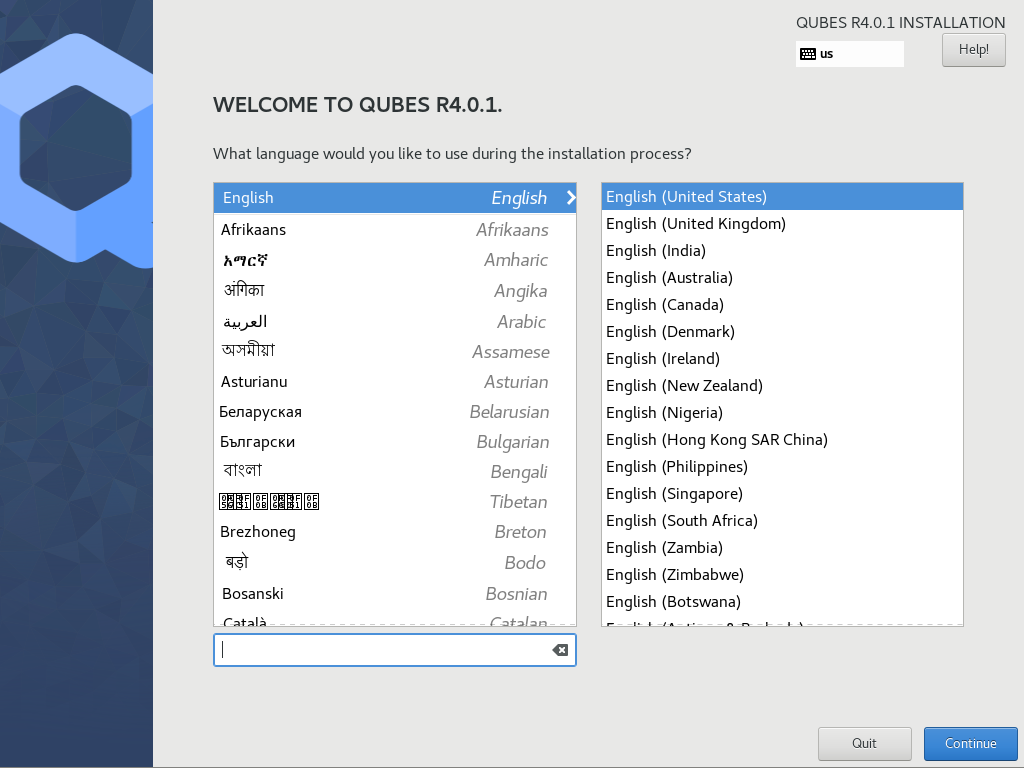
On the first screen, you are asked
to select the language that will be used during the installation process. When
you are done, select
Continue.
Prior to the next screen, a compatibility
test runs to check whether IOMMU-virtualization is active or not. If the test
fails, a window will pop up like this:
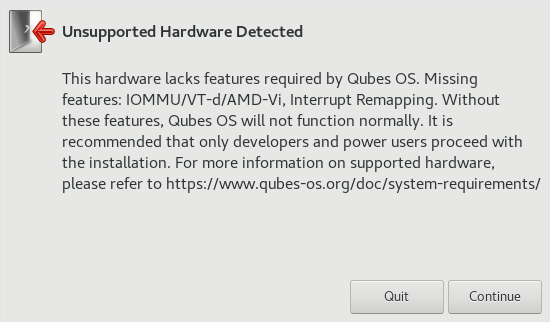
Do not panic. It may simply
indicate that IOMMU-virtualization hasn’t been activated in the BIOS.. If the
setting is not configured correctly, it means that your hardware won’t be able
to leverage some Qubes security features, such as a strict isolation of the
networking and USB hardware.
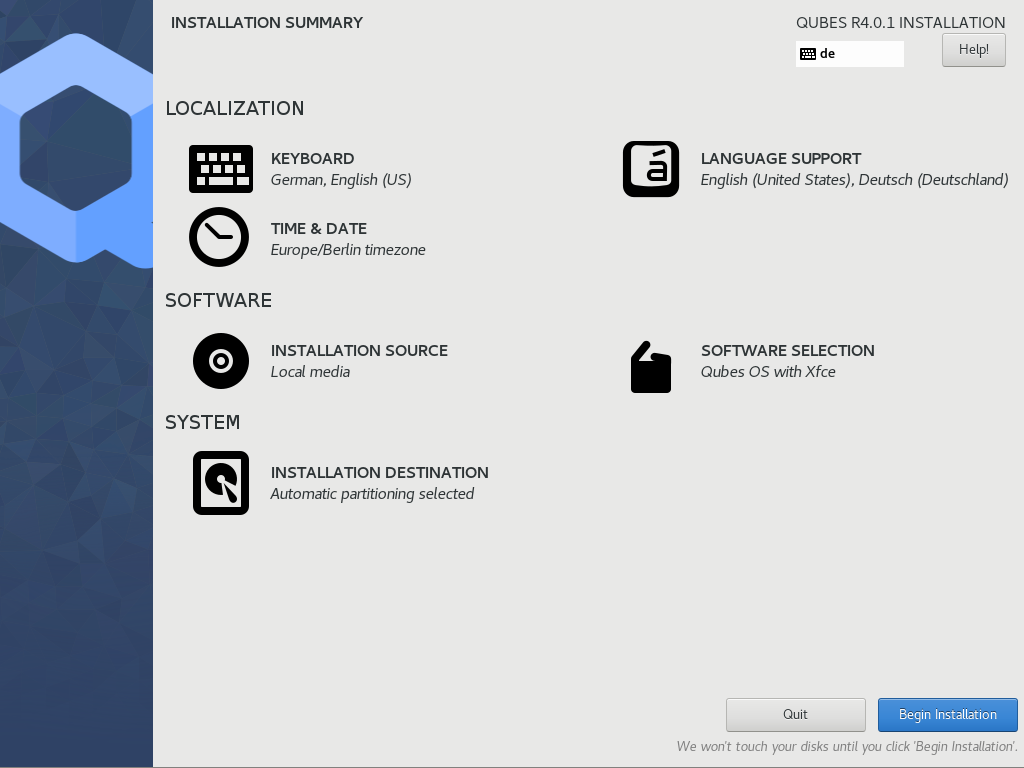
If the test passes, you will reach
the installation summary screen. The installer loads Xen right at the
beginning. If you can see the installer’s graphical screen, and you pass the
compatibility check that runs immediately afterward, Qubes OS is likely to work
on your system!
The Installation summary screen
allows you to change how the system will be installed and configured, including
localization settings.

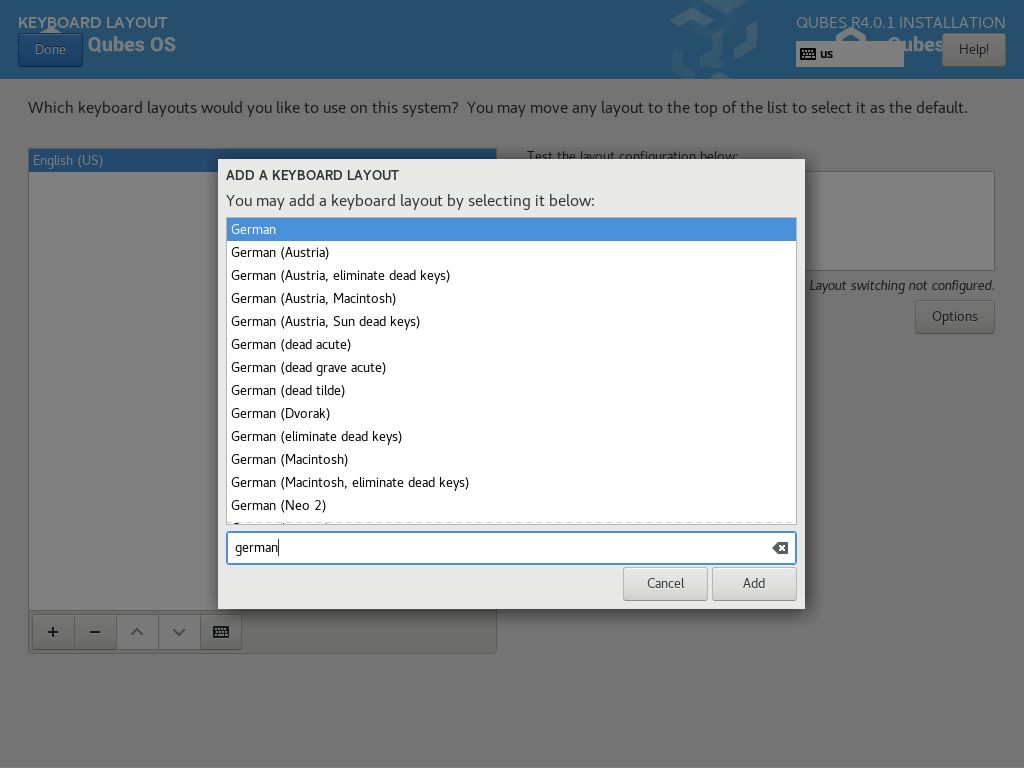
Let’s assume you wish to add a
German keyboard layout. Go to Keyboard Layout, press the “Plus” symbol, search
for “German” as indicated in the screenshot and press “Add”. If you want it be
your default language, select the “German” entry in the list and press the
arrow button. Click on “Done” in the upper left corner, and you’re ready to go!
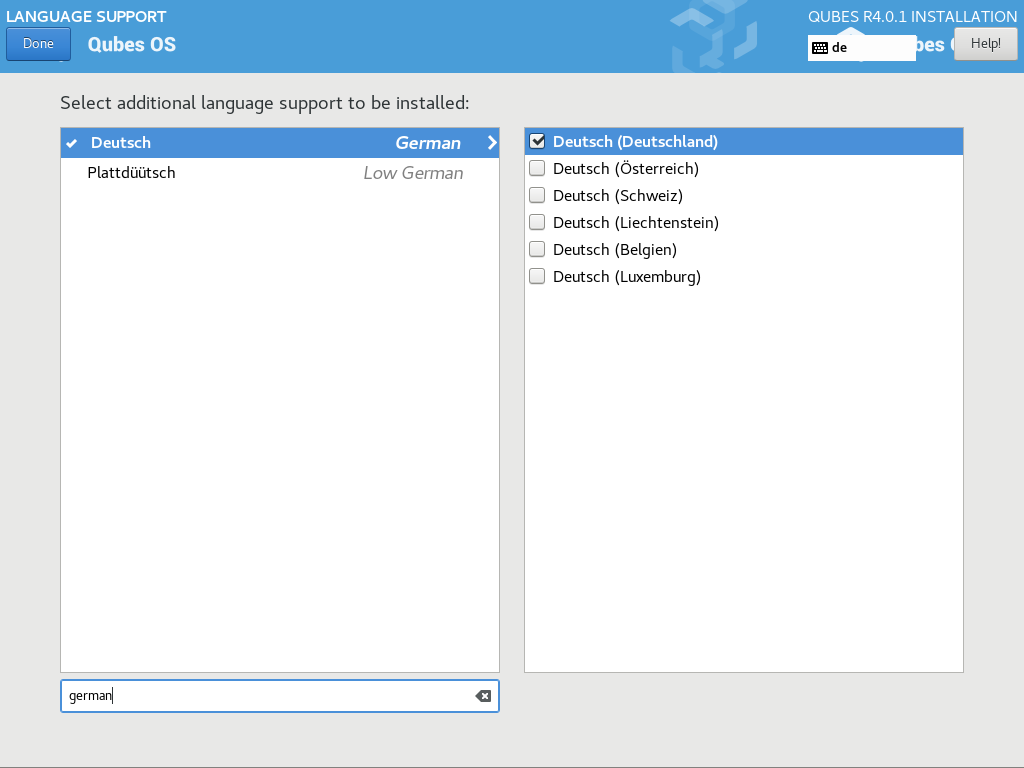
The process to select a new
language is similar to the process to select a new keyboard layout. Follow the
same process in the “Language Support” entry.
You can have as many keyboard
layout and languages as you want.
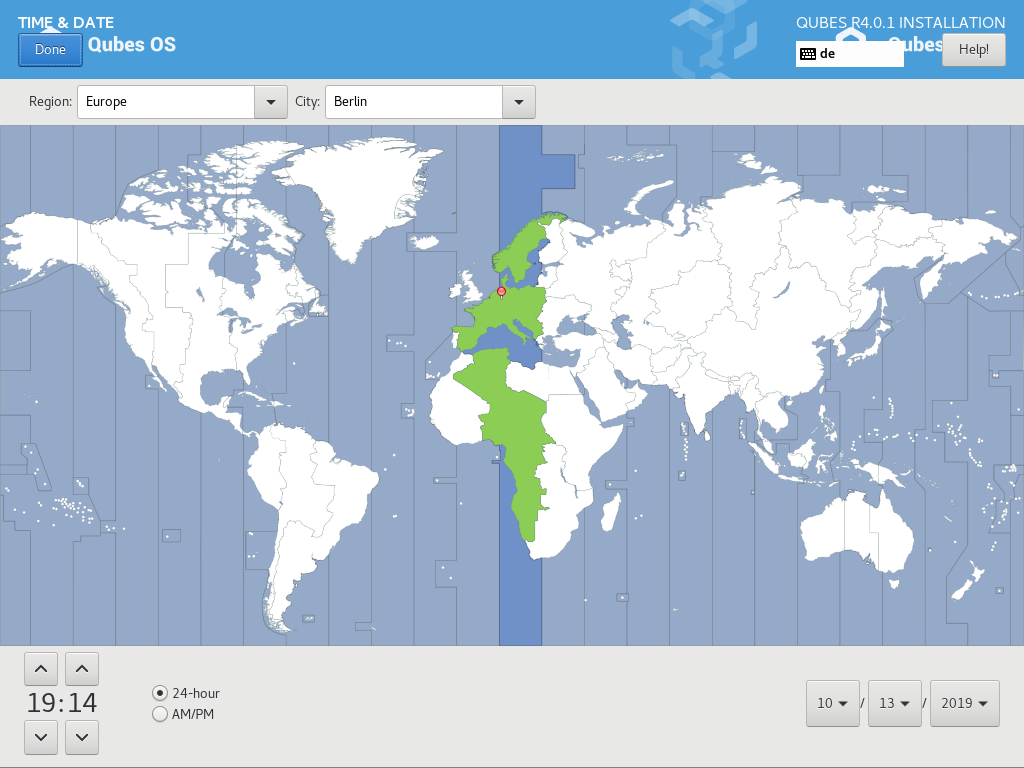
Don’t forget to select your time
and date by clicking on the Time & Date entry.
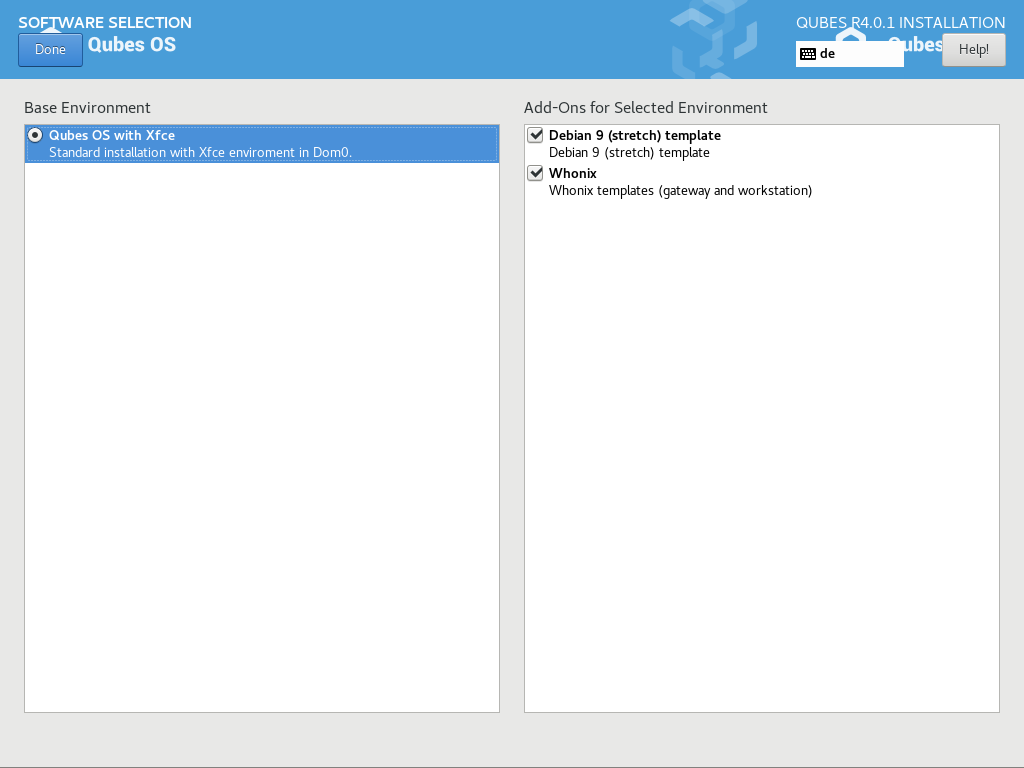
On the software selection tab, you
can choose which software to install in Qubes OS.
Two options are available:
• Debian
• Whonix
I prefer selecting both, because it
will increase the security of Qubes.Press
Done to go
back to the installation summary screen.
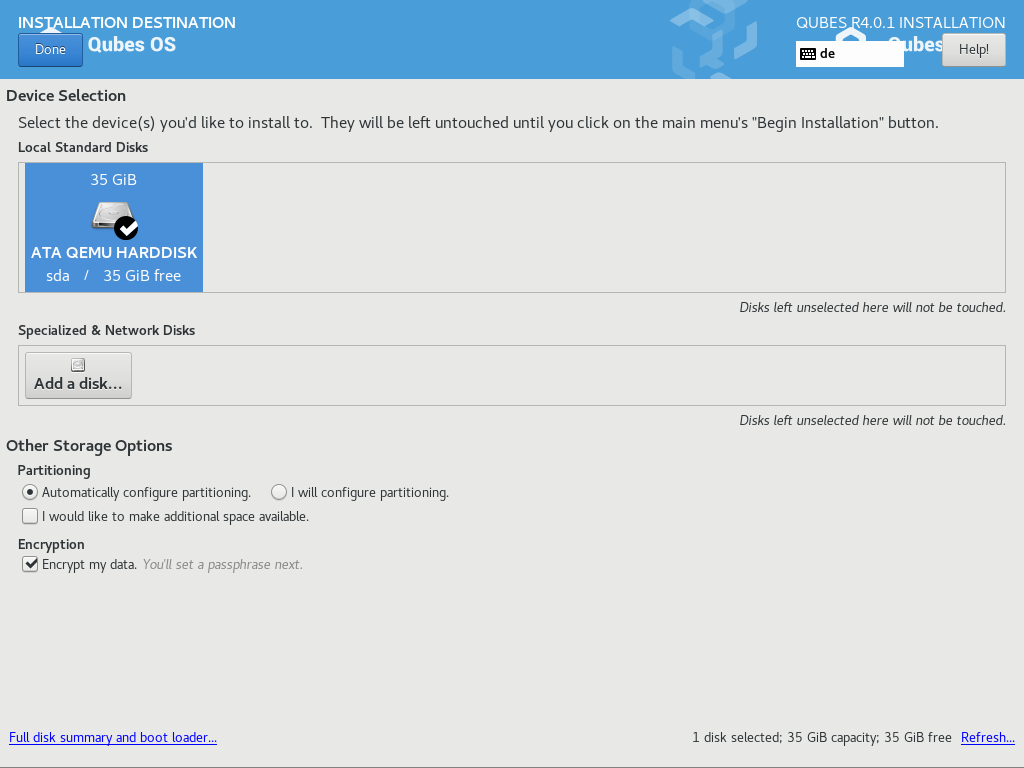
Under the System section, you must
choose the installation destination. Select the storage device on which you
would like to install Qubes OS.
Warning: Be
careful to choose the correct installation target, or you may lose data. I
strongly recommended making a full backup before proceeding.
Your installation destination can
be an internal or external storage drive, such as an SSD, HDD, or USB drive.
The installation destination must have a least 32 GB of free space available.
Note: The
installation destination cannot be the same as the installation medium. For
example, if you're installing Qubes OS from a
USB drive onto a
USB drive, they must be two distinct USB drives, and they must both be plugged
into your computer at the same time.
Installing an operating system onto
a USB drive can be a convenient way to try Qubes. However, USB drives are
typically much slower than internal SSDs. I recommend you to use a very fast
USB 3.0 drive for decent performance. Please note that a minimum storage of 32
GB is required. If you want to install Qubes OS onto a USB drive, just select
the USB device as the target installation device. Keep in mind that the
installation process is likely to take longer than it would on an internal
storage device.
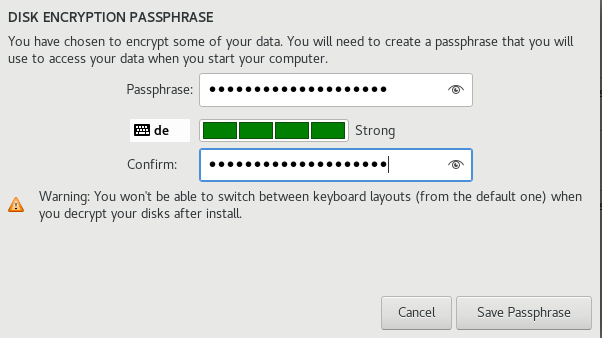
As soon as you press Done, the
installer will ask you to enter a passphrase for disk encryption. The
passphrase should be complex. Make sure that your keyboard layout reflects what
keyboard you are actually using. When you’re finished, press Done.
Warning: If
you forget your encryption passphrase, there is no way to recover it.
When you’re ready, press
Begin
Installation.
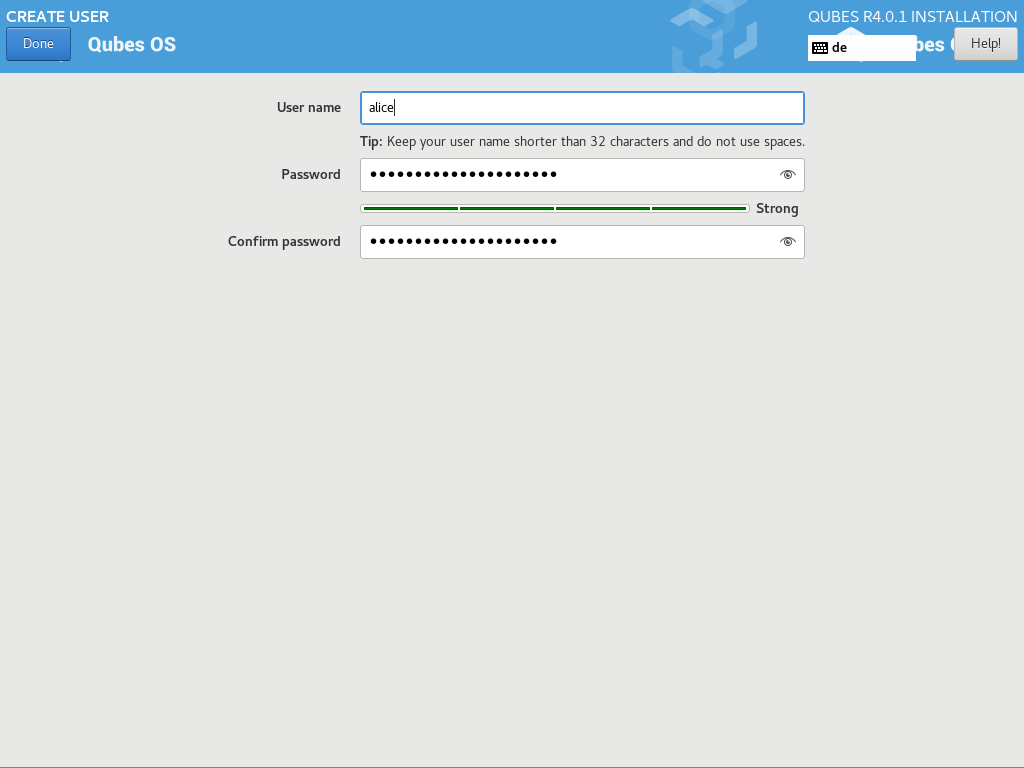
While the installation process is
running, you can create your user account. This is what you’ll use to log in
after disk decryption and when unlocking the screen locker. This is a purely
local, offline account in dom0. By design, Qubes OS is a single-user operating
system, so this is just for you.
Select User
Creation to define a new user with administrator privileges and a
password. Just as for the disk encryption, this password should be complex. The
root account is deactivated and it should remain as such.
When the installation is complete,
press Reboot. Don’t forget to remove the installation
medium, or else you may end up seeing the installer boot screen again.
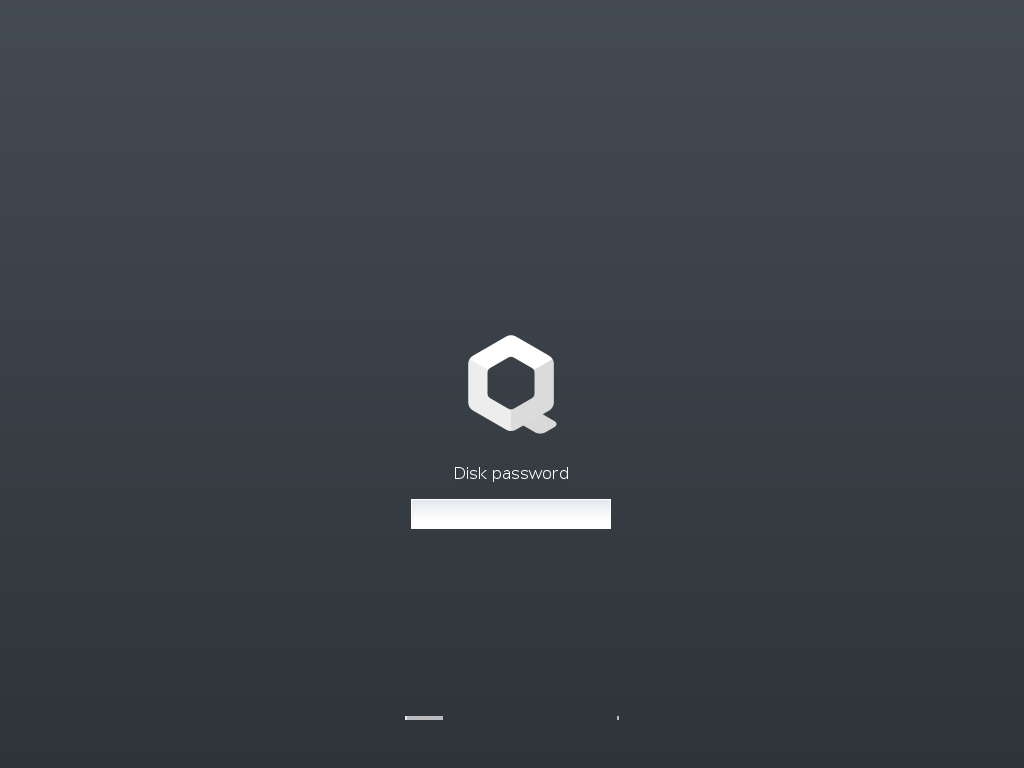
If the installation was successful,
you should now see the GRUB menu during the boot process.
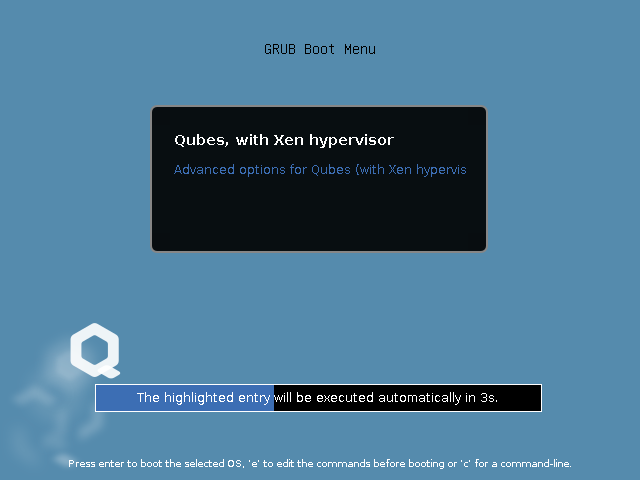
Just after this screen, you will be
asked to enter the disk encryption passphrase.
You’re almost done. Before you can
start
using Qubes OS, some configuration is needed.
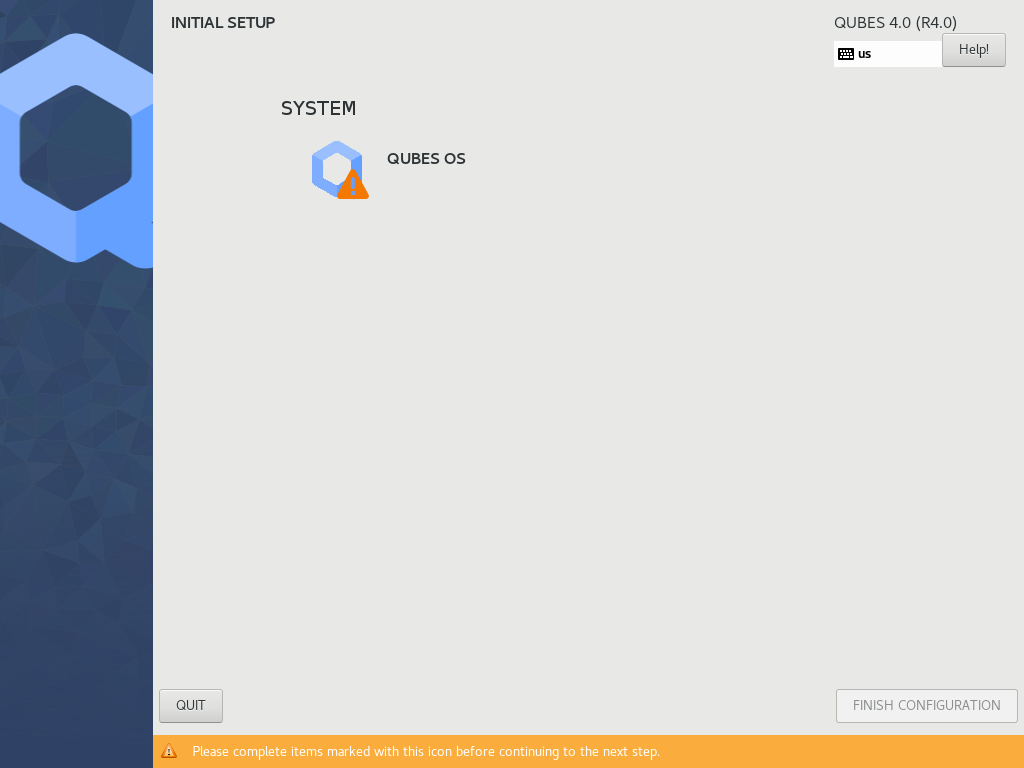
By default, the installer will
create a number of qubes (depending on the options you selected during the
installation process).
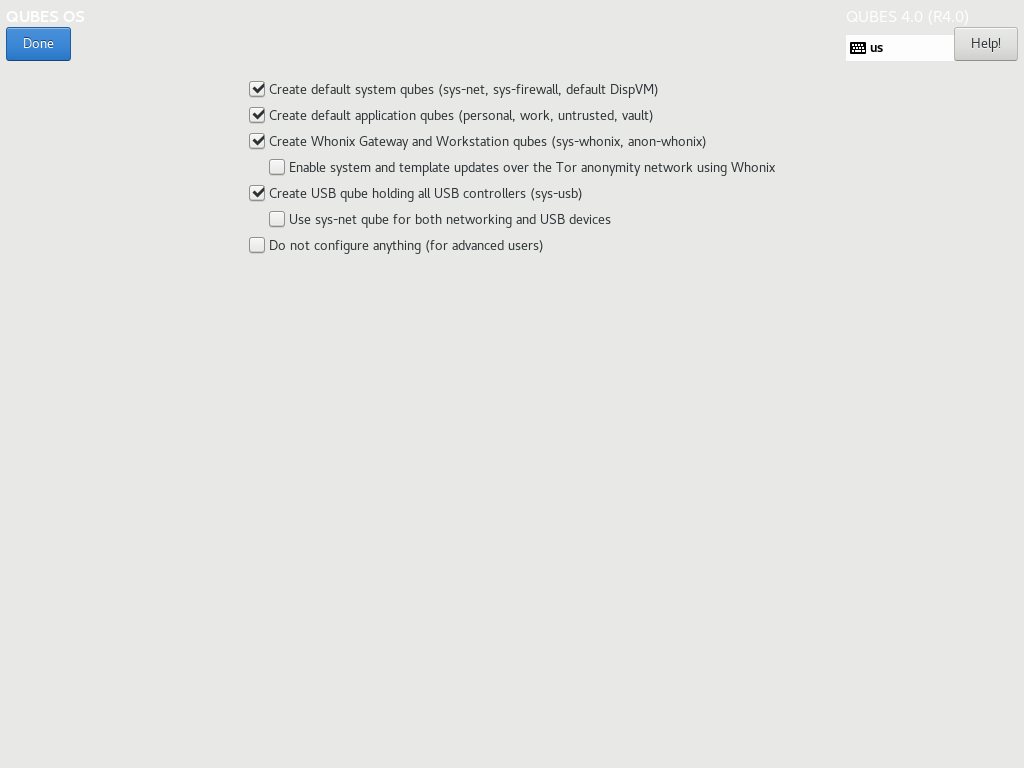
Let’s briefly go over the options:
• Create
default system qubes: These are the core components of the
system, required for things like internet access.
• Create
default application qubes: These are how you compartmentalize
your digital life. There’s nothing special about the ones the installer
creates. They’re just suggestions that apply to most people. If you decide
you don’t want them, you can always delete them later, and you can always
create your own.
• Create
Whonix Gateway and Workstation qubes: If you want
to use Whonix, you should select this option.
• Enabling
system and template updates over the Tor anonymity network using Whonix: If you
select this option, then whenever you install or update software in dom0
or a TemplateVM, the internet traffic will go through Tor.
• Create
USB qube holding all USB controllers: Just like
the network qube for the network stack, the USB qube isolates the USB
controllers.
• Use
sys-net qube for both networking and USB devices: You should
select this option if you rely on a USB device for network access, such
as a USB modem or a USB Wi-Fi adapter.
• Do
not configure anything: This is for very advanced users
only. If you select this option, you’ll have to set everything up manually
afterward.
When you’re satisfied with your
choices, press Done. This configuration process may
take a while, depending on the speed and compatibility of your system.
After the configuration is done,
you will be greeted by the login screen. Enter your password and log in.
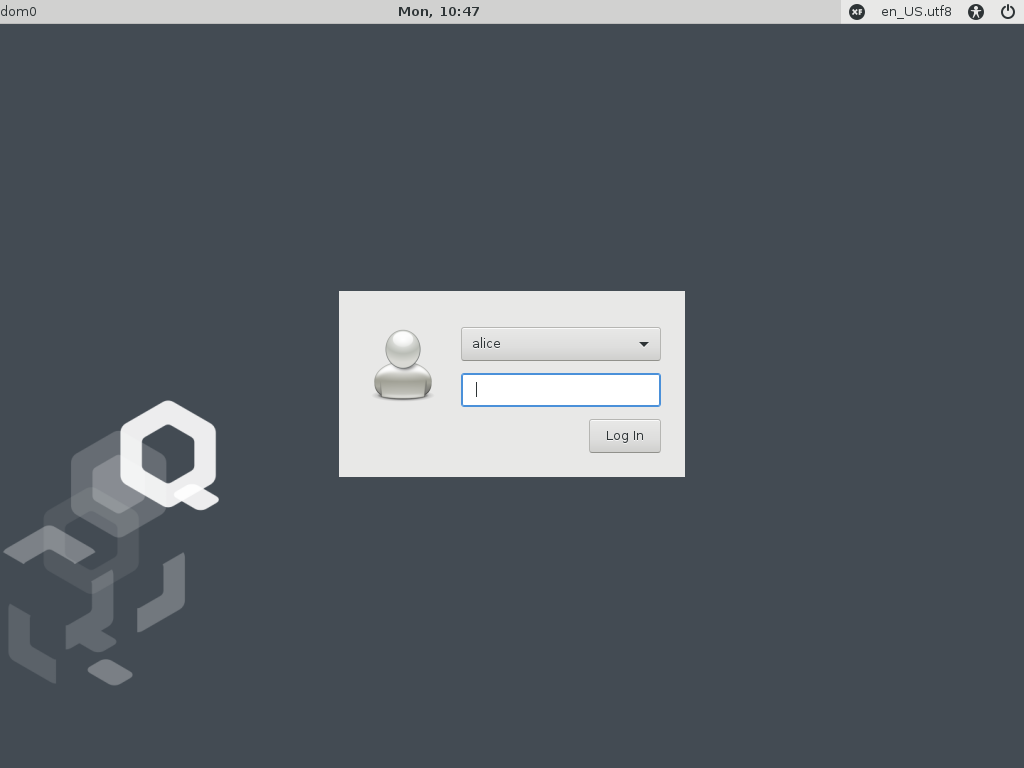
Congratulations, you are now ready
to use Qubes OS!
 BACK TO TABLE OF CONTENTS
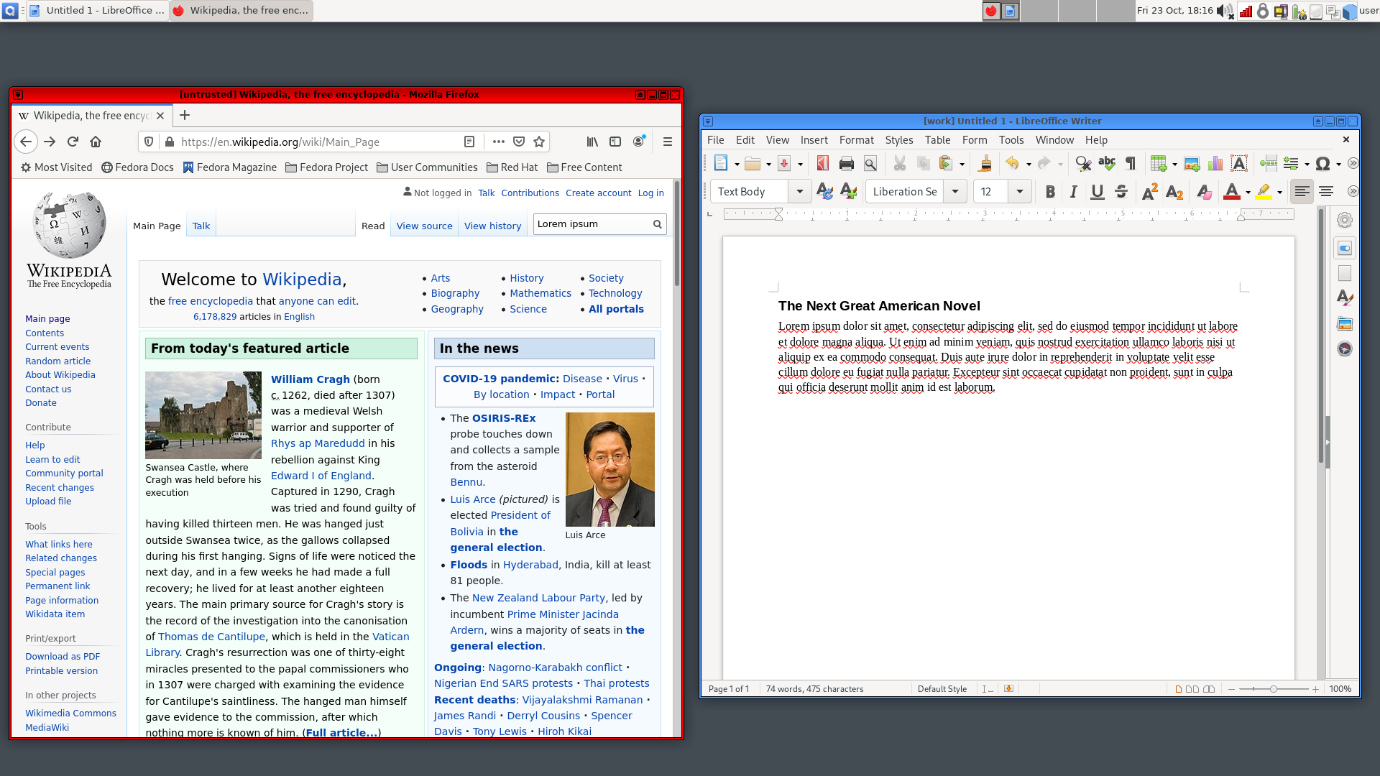
In Qubes OS, you run all your
programs in virtual
machines (VMs) called qubes.
Not every app runs in its own qube. Each qube represents a security domain (e.g.,
“work,” “personal,” and “banking”). By default, all qubes are based on a
single, common template, although
you can create more templates if you wish. When you create a new qube, you
don’t copy the whole system needed for this qube to work (which would include
copying all the programs). Instead, each qube shares the system with its respective
template. A qube has read-only access to the system of the template on which
it’s based, so a qube cannot modify a template in any way. This is important,
as it means that if a qube is ever compromised, the template on which it’s
based (and any other qubes based on that template) will still be safe. So,
creating a large number of qubes is cheap: each one needs only as much disk
space as is necessary to store its private files (e.g., the “home” folder).
If you’ve installed Qubes OS using
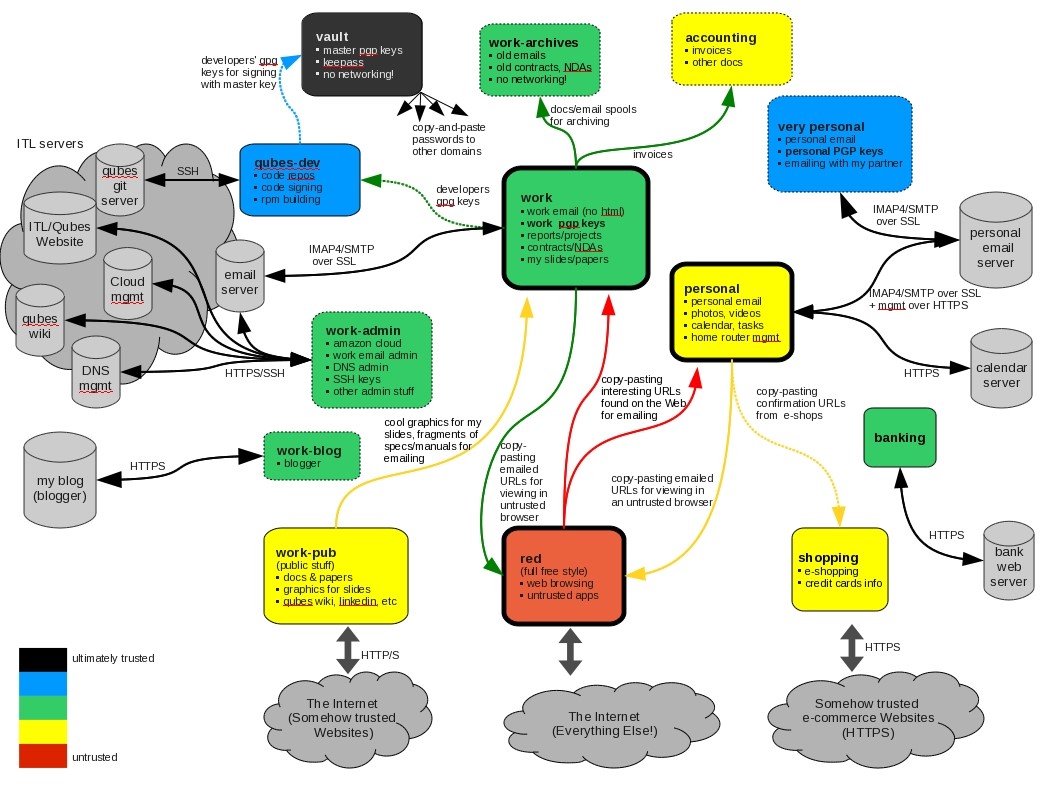
the default options, a few qubes have already been created for you:
• Work
• Personal
• Untrusted
• Vault
Each qube, apart from having a
distinct name, is also assigned a label, which is
one of several predefined colours. The trusted window manager uses these colours
in order to draw coloured borders around the windows of applications running in
each qube. This is designed to allow you to quickly and easily identify the
trust level of a given window at a glance. Most Qubes OS users associate red
with what’s untrusted and dangerous (like a red light – stop! danger!), green
with what’s safe and trusted, and yellow and orange with things in the middle.
This colour scheme also extends to include blue and black, which are usually
interpreted as indicating progressively more trusted domains than green, with
black being ultimately trusted. However, it’s totally up to you how you’d like
to interpret these colours. Qubes OS doesn’t assume anything about these colours.
When you make a new qube, the system doesn’t do anything special to it
depending on whether it’s black or red, for example. The only difference is
which colour you see and the meaning you assign to that colour in your mind. For
example, you could use the colors to show that qubes belong to the same domain. For instance, you might use three or four qubes for work activities and give them all the
same distinct colour label.
In addition to qubes and templates,
there’s one special domain called dom0, where
many system tools and the desktop manager run. This is where you log in to the
system. Dom0 is more trusted than any other domain (including templates and
black-labelled qubes). If dom0 was ever compromised, it would be “game over.”
(The entire system would effectively be compromised.) Due to its great importance, dom0 has no network connectivity and is used only for running the
window and desktop managers. Dom0 shouldn’t be used for anything else. In
particular, you
should never run user applications in dom0, instead, you should run user application in qubes. (That’s
what your qubes are for!)
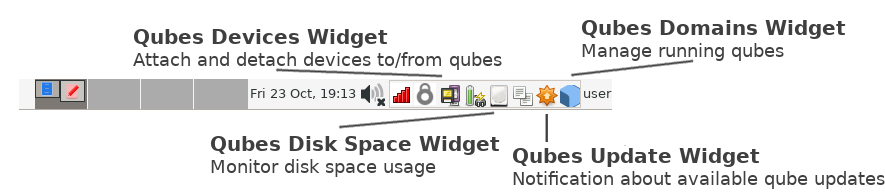
• The Domains Widget allows
you to manage running qubes, turn them on and off, and monitor memory
usage.
• The Devices Widget allows
you to attach and detach devices – such as USB drives and cameras – to
qubes.
• The Disk Space Widget will
notify you if you’re ever running out of disk space.
• The Updates Widget will
inform you when template updates are available.
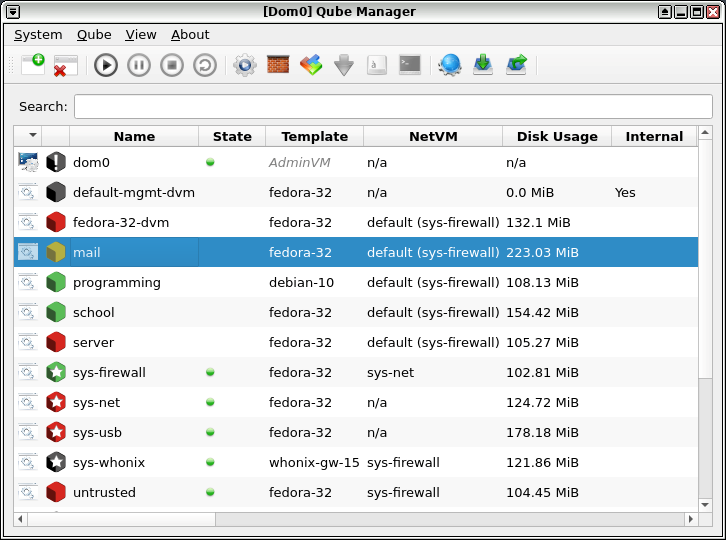
For an overview of the entire
system, you can use the Qube Manager (go
to the Application Launcher → System Tools → Qube Manager), which displays the
states of all the qubes in your system.
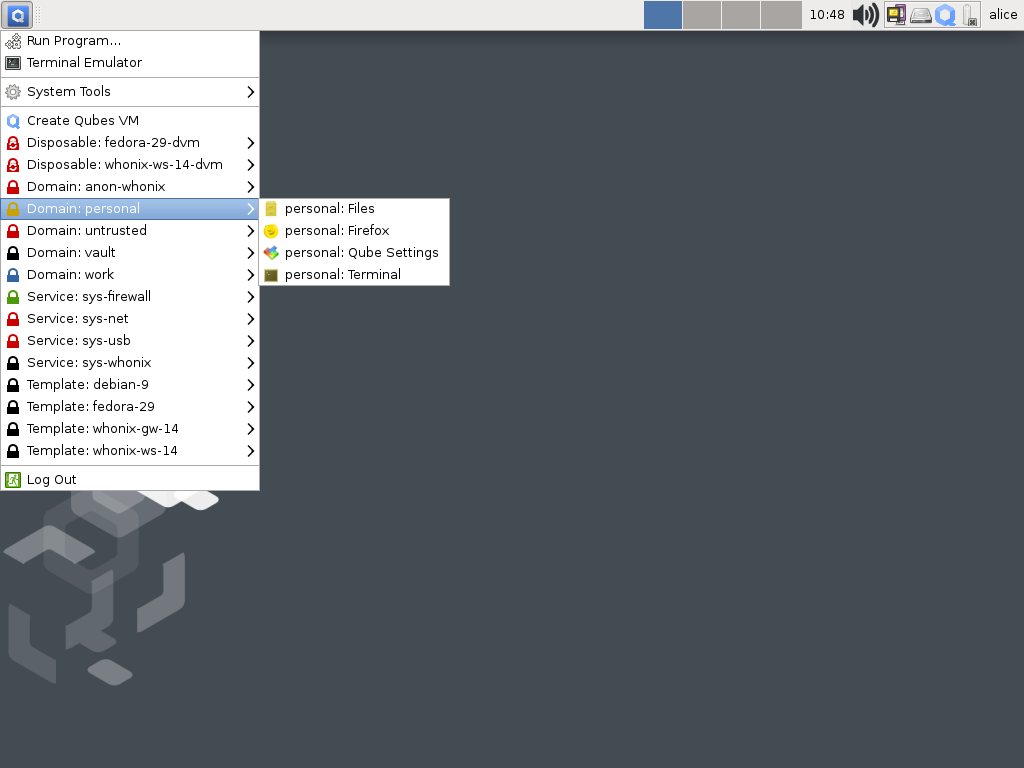
Apps can be started either by using
the shortcuts in the Application Launcher menu or by using the command line
(i.e., a terminal running in dom0).
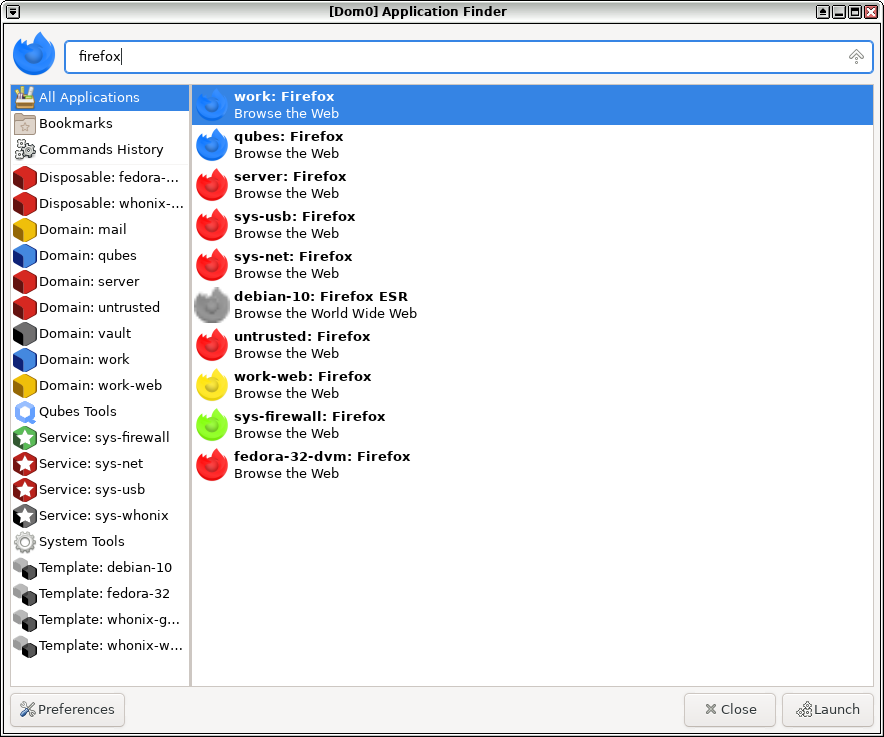
You can start apps directly from
the Application Launcher or the Application Finder (Alt+F3). Each
qube has its own menu directory under the scheme Domain:
<name>. After navigating into one of these directories, simply click on
the application you’d like to start:
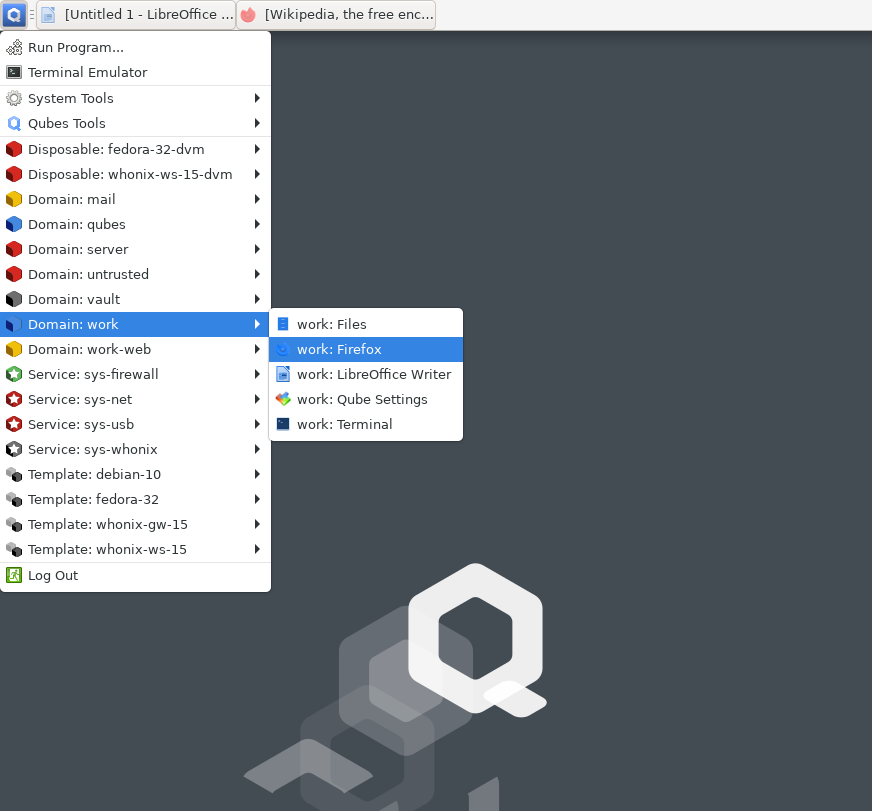
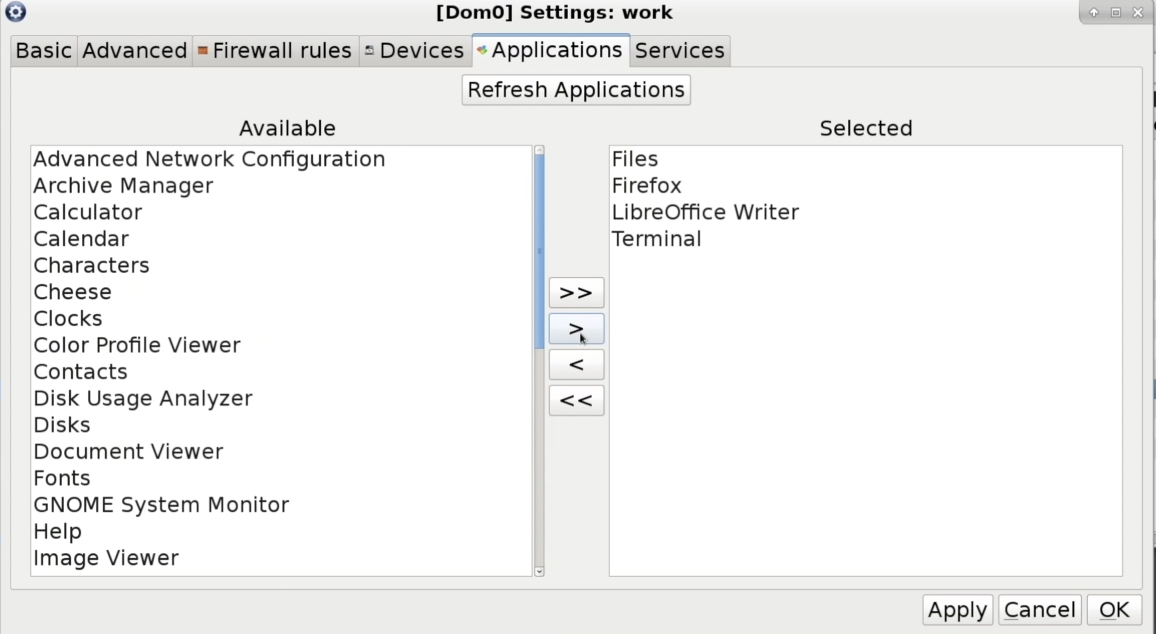
By default, each qubes’ menu
contains only a few shortcuts. If you’d like to add more, enter the
qube’s Qube Settings and add them on the
Applications tab.
You can easily create a new qube
with the Create Qubes VM option in the Application Launcher.
If you need to add or remove qubes, simply use the Qube Manager’s Add and Remove buttons.
That’s a great question, but
there’s no one-size-fits-all answer. It depends on the structure of your
digital life, and this is at least a little different for everyone. If you plan
on using your system for work, then it also depends on what kind of job you do.
It’s a good idea to start out with
the three qubes created automatically by the installer: work, personal, and
untrusted. When you start to feel that some activity just doesn’t fit
into any of your existing qubes, or you want to partition some part of your
life, you can easily create a new qube for it.
Qubes OS features a secure inter-qube
clipboard that allows you to copy and paste text between different qubes.
In order to copy text from Qube A
to Qube B:
1. Select text from the source app in qube A, then copy it normally by pressing Ctrl + C.
2. With the source app in qube A still in focus, press Ctrl + Shift + C.
This copies the text from qube A’s clipboard to the inter-qube clipboard.
3. Select the target app in qube B and press Ctrl + Shift + V. This
copies the text from the inter-qube clipboard to qube B’s clipboard and clears
the inter-qube clipboard, ensuring that only qube B will have access to the
copied text.
4. Paste the text in the target app in qube B normally by pressing Ctrl + V.
This process might look complicated
at first glance, but in practice it is actually very easy and fast once you get
used to it. At the same time, it provides you with full control over exactly
which qube receives the content of the inter-qube clipboard every time.
Qubes OS supports the secure
copying and moving of files and directories (folders) between qubes.
For simplicity, these instructions
will refer to copying/moving a single file, but they apply equally well to
groups of files and directories, which are copied recursively.
1. Open a file manager in the qube containing the file you wish to
copy (the source qube), right-click on the file you wish to copy or move, and
select Copy to Other AppVM... or Move to
Other AppVM....
2. A dialog box will appear in dom0 asking for the name of the target
qube (qube B). Enter or select the desired destination qube name.
3. If the target qube is not already running, it will be started
automatically, and the file will be copied there. It will show up in this
directory (which will automatically be created if it does not already exist):
/home/user/QubesIncoming/<source_qube>/<filename>
If you selected Move rather
than Copy,
then the original file in the source qube will be deleted.
If you wish, you may now
move the file in the target qube to a different directory and delete the /home/user/QubesIncoming/ directory
when no longer needed.
Normally,
the Qubes restricts a VM from “owning” the full screen, ensuring that there are
always clearly marked decorations drawn by the trusted Window Manager around
each of the VMs window. This allows the user to easily realize to which domain
a specific window belongs to.
If one
allowed one of the VMs to “own” the full screen, e.g. to show a movie on a full
screen, it might not be possible for the user to know if the applications/VM has
really “released” the full screen, or if it has started emulating the whole
desktop and is pretending to be the trusted Window Manager, drawing shapes on
the screen that look (e.g.) like other windows, belonging to other domains
(e.g. to trick the user into entering a secret passphrase into a window that
looks like belonging to some trusted domain).
However, it
is possible to deal with full screen mode in a secure way assuming there are
mechanisms that can be used at any time to switch between windows or show the
full desktop and that cannot be intercepted by the VM. The simplest example is
the use of Alt+Tab for switching between windows, which is a shortcut handled
by dom0.
You can
always put a window into full screen mode by using the trusted window manager
by right-clicking on a window’s title bar and selecting “Fullscreen” or
pressing Alt + F11. This functionality should still be considered safe, since a VM
window still can’t voluntarily enter fullscreen mode. The user must select this
option from the trusted window manager in dom0. To exit fullscreen mode from
here, press alt + space to bring up the title bar menu again, then select “Leave
Fullscreen” or simply press Alt + F11.
A
DisposableVM is a VM that can be created quickly and will disappear
when closed. DisposableVMs are usually created in order to host a single
application, like a viewer, editor, or web browser.
From inside
an AppVM, choosing the Open in DisposableVM option on a file will launch a
DisposableVM for just that file. Changes made to a file opened in a
DisposableVM are passed back to the originating VM. This means that you can
safely work with untrusted files without risk of compromising your other VMs.
DisposableVMs can be launched either directly from dom0’s Start Menu or
terminal window, or from within AppVMs. While running, DisposableVMs will
appear in Qubes VM Manager with the name disp####.
If a DisposableVM
Template becomes
compromised, then any DisposableVM based on that DisposableVM Template could be
compromised. In particular, the default DisposableVM Template is important
because it is used by the “Open in DisposableVM” feature. This means that it
will have access to everything that you open with this feature. For this
reason, it is strongly recommended that you base the default DisposableVM
Template on a trusted TemplateVM.
Similarly to
how AppVMs are based on their underlying TemplateVM,
DisposableVMs are based on their underlying DisposableVM
Template.
On a fresh
installation of Qubes, the default DisposableVM Template is called fedora-XX-dvm (where XX is the Fedora version of the default
TemplateVM). If you have included the Whonix option in your install, there will
also be a whonix-ws-dvm DisposableVM Template available for
your use.
NetVM and
firewall rules for DisposableVM Templates can be set as they can for a normal
VM. By default a DisposableVM will inherit the NetVM and firewall settings of
the DisposableVM Template on which it is based. Launching a DisposableVM from
an AppVM will result in it using the network/firewall settings of the
DisposableVM Template on which it is based. For example, if an AppVM uses
sys-net as its NetVM, but the default system DisposableVM uses sys-whonix, any
DisposableVM launched from this AppVM will have sys-whonix as its NetVM.
A
DisposableVM launched from the Start Menu inherits the NetVM and firewall
settings of the DisposableVM Template on which it is based. Note that changing
the “NetVM” setting for the system default DisposableVM Template does affect the NetVM of DisposableVMs
launched from the Start Menu. Different DisposableVM Templates with individual
NetVM settings can be added to the Start Menu.
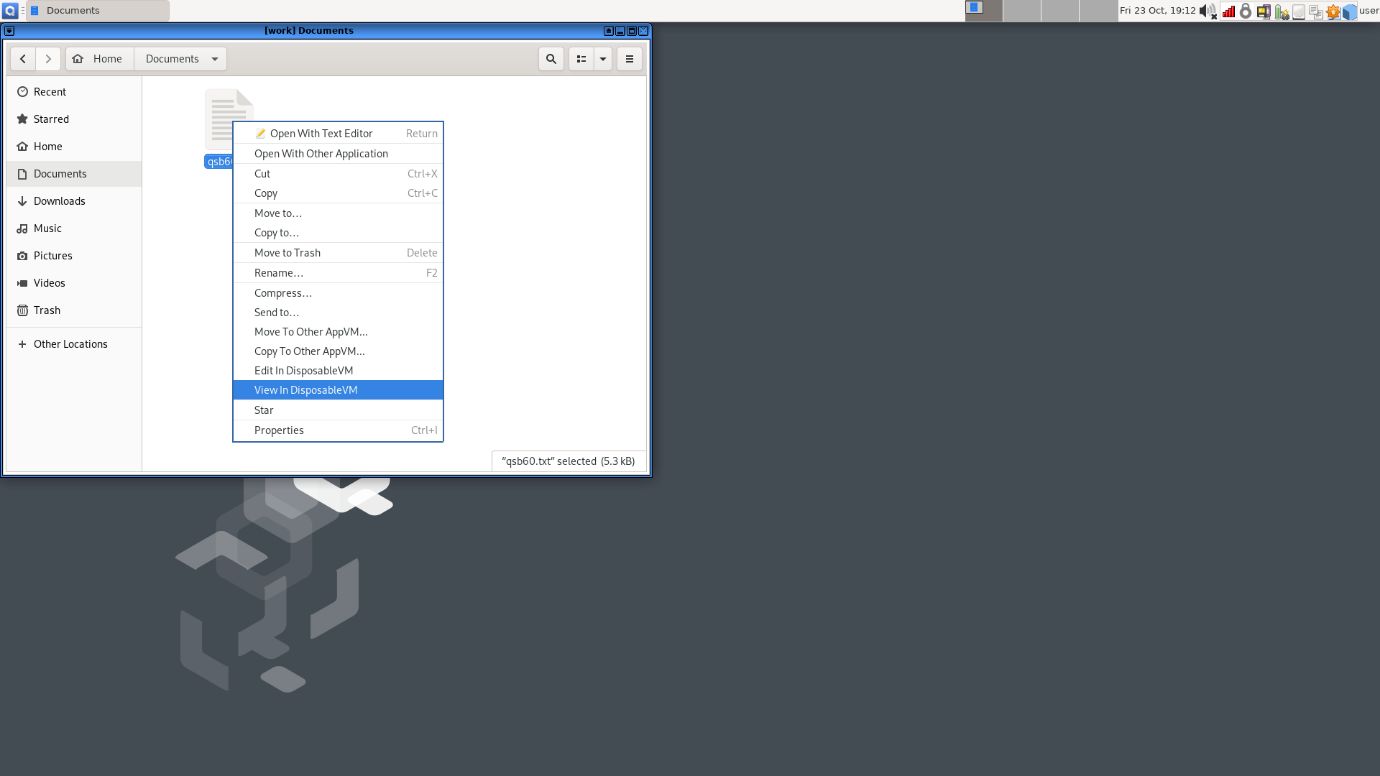
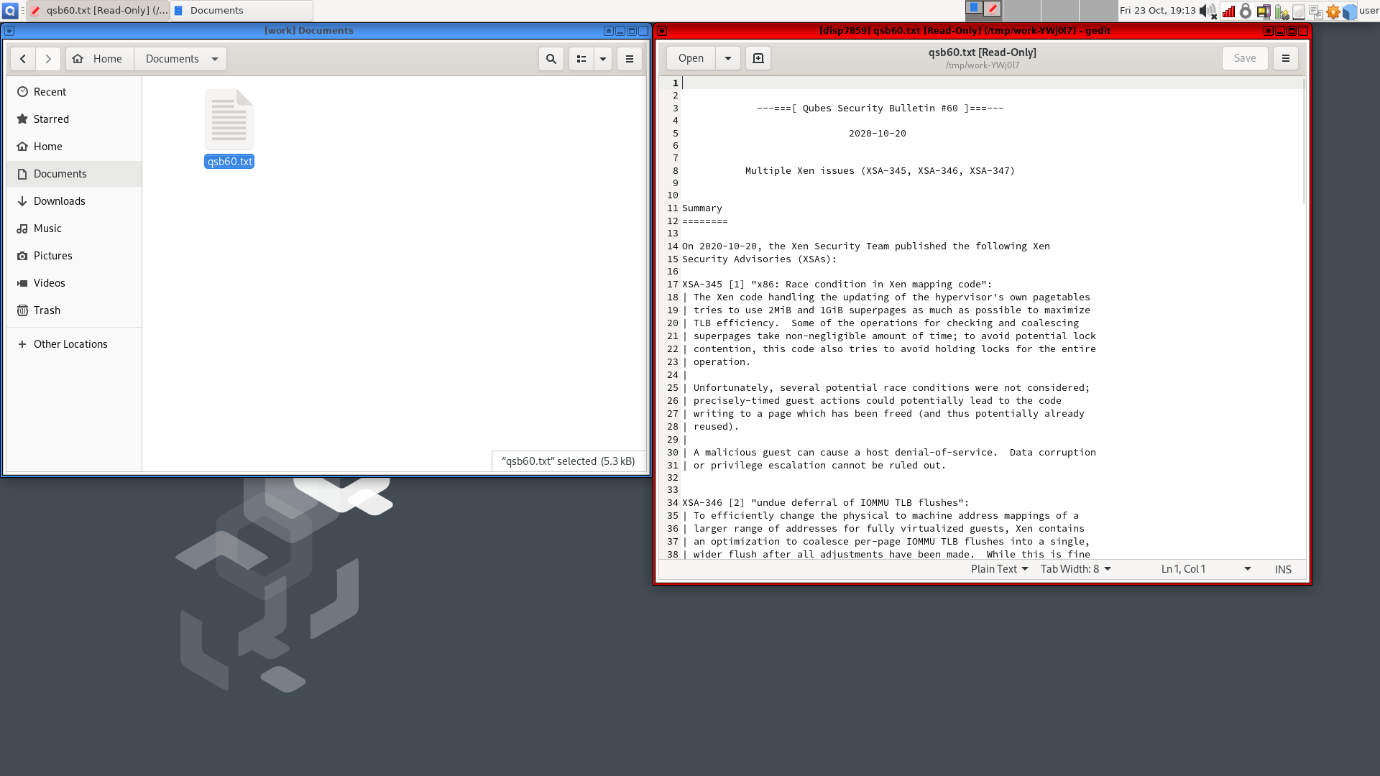
In an
AppVM’s file manager, right click on the file you wish to open in a
DisposableVM, then choose “View in DisposableVM” or “Edit in DisposableVM”.
Wait a few seconds and the default application for this file type should appear
displaying the file content. This app is running in its own dedicated VM – a
DisposableVM created for the purpose of viewing or editing this very file. Once
you close the viewing application, the whole DisposableVM will be destroyed. If
you have edited the file and saved the changes, the changed file will be saved
back to the original AppVM, overwriting the original file.
Sometimes it
is desirable to open an instance of Firefox within a new fresh DisposableVM.
This can be done easily using the Start Menu: just go to Application
Menu -> DisposableVM -> Firefox Web Browser. Wait a
few seconds until a web browser starts. Once you close the viewing application, the whole DisposableVM will be destroyed.
 BACK TO TABLE OF CONTENTS
The
interface to deal with devices of all sorts is the tool tray icon with a yellow
square ( ) located in the top right of your screen by default.
There are
currently four categories of devices Qubes understands:
• Microphones
• Block
devices
• USB
devices
• PCI devices
Microphones,
block devices and USB devices can be attached with the GUI-tool. PCI devices
can be attached using the Qube Settings, but they require a VM reboot.

When
clicking on the tray icon ( ): several device-classes separated by lines are
displayed as tooltip. Block devices are displayed on top, microphones one below
and USB-devices at the bottom.
On most
laptops, integrated hardware such as cameras and fingerprint-readers are
implemented as USB-devices and can be found here.
Click on the
tray icon. Hover on a device you want to attach to a VM. A list of running VMs
(except dom0) appears. Click on one and your device will be attached!
To detach a device, click the tray icon again. Attached devices are
displayed in bold. Hover the one you want to detach. A list of VMs appears, click on the one
showing the eject symbol ( ).
 BACK TO TABLE OF CONTENTS
To copy a file from dom0 to a VM, open
the terminal of dom0, use "qvm-copy-to-vm":
qvm-copy-to-vm <target_vm> <file>
The file will arrive in the target
VM in the /home/user/QubesIncoming/dom0/ directory.
Use the Qubes
Clipboard widget:
1. Copy text to the clipboard normally in dom0 by pressing Ctrl + C.
2. Click the Qubes Clipboard icon
in the Notification Area.
3. Click “Copy dom0 clipboard”. This displays a notification that "text
has been copied to the inter-qube clipboard."
4. Press Ctrl + Shift + V in the target qube. This pastes the inter-qube
clipboard contents into the target qube’s normal clipboard.
5. Paste normally within that qube by pressing Ctrl + V.
Copying anything into dom0 is not
advised, since doing so can compromise the security of your Qubes system.
If you are determined to copy some
files to dom0, you can use the following method.
(If you want to copy text,
first save it into a text file.) Run this command in a dom0 terminal:
qvm-run --pass-io <source-vm> 'cat /path/to/file_in_source_domain' > /path/to/file_name_in_dom0
Installing softwares on qubes is a very complex process, so to make it easy for everyone, I have written a step-by-step guide which can help you install software on specific domains.
Follow the steps below to install software on specific domains:
1) To install a software on a specific domain, we will install the
software on the Template VM of the qube first, and then the specific domain
will have the software automatically installed in it. For instance, if we want
to install a software on the “Work” domain, then we will install the software
on the Fedora-30 Template first, because “Work” domain is based on Fedora-30.
2) For the first time, we will need to enable internet access in the
Template VM, to do so, open the “Qube Settings” of the Template VM.
3) Change the NetVM from “None” to “sys-net”.
4) Click “OK” to save the settings.
5) Now we will install the software on the Template VM.
6) Go to Applications > [Template VM] > Software .
7) Search for the software, and then install it.
8) Once the software has been installed, shut down the Template VM,
because it is necessary to shutdown the Template VM to implement the changes.
9) Now we are ready to use the installed software on the VMs based on
the Template, on which we have installed the software. But the problem is that
we aren’t able to access the program directly from the Application Menu, to do
so :
10) Open the “Qube Settings” of the VM on which you want to use the
software.
11) Go to the “Applications” tab in the settings of the VM.
12) Click “Refresh Applications”.
13) On the left side of the screen, you will be able to see the list
of programs installed on the VM, and on the right side of the screen, you will
be able to see the list of programs visible in the Applications Menu.
14) Select the installed program from the “Available” tab.
15) Click on the “>” icon.
16) Click “OK” to save the settings.
17) Done, now you will be able to access the program from the
Applications Menu of the VM.
Keep in mind that you should only install a safe software in
the Template VM, because if the Template VM gets infected, then all the VMs
based on it, will also be infected.
 BACK TO TABLE OF CONTENTS
Installing software on a Whonix
based qube is quite
different, because there isn’t a GUI which allows us to install
a software, instead, we can use the terminal to install software on a Whonix
based system.
Follow the steps below to install a software on a
Whonix based qube:
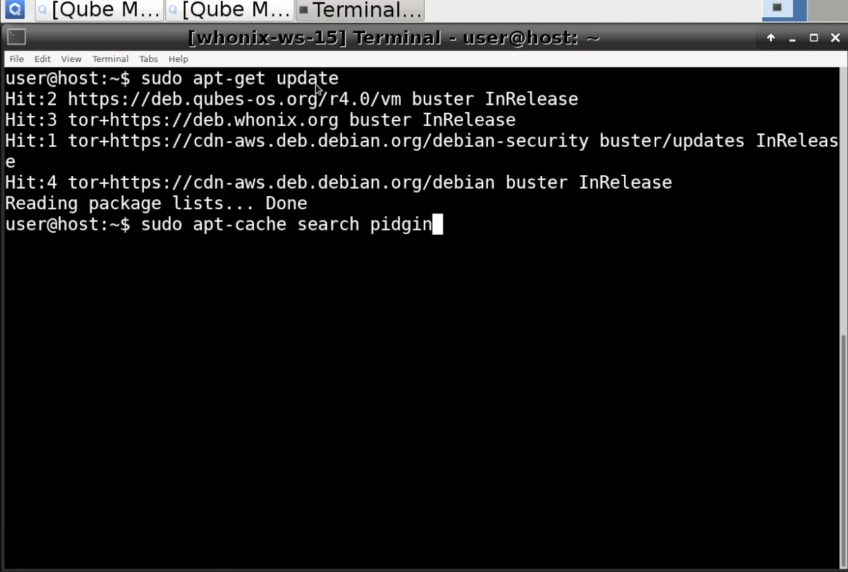
1) Open the Xfce Terminal of “Template : Whonix-ws-15”.
2) First we will update the list of
applications/software available, to do so, run “sudo apt-get update”. This will
update the list of software available. “Sudo” is a command which gives us
administrator privileges in the terminal.
3) Now we will search for the application, to do so, run
“sudo apt-cache search [application name / service / tool]”. Now it will list
all the software related to the search. Copy the name of the software/package
you want to install.
4) Now we are going to install the software, to do so,
run “sudo apt-get install [application name/package name]”. It might ask you
for a confirmation, type “y” and then press [ENTER] to confirm it. Now the
software/package has been installed.
5) Now we are ready to use the installed software on the Whonix VM.
But the problem is that we aren’t able to access the program directly from the
Application Menu, to do so :
6) Open the “Qube Settings” of the Whonix VM.
7) Go to the “Applications” tab in the settings of the Whonix VM.
8) Click “Refresh Applications”.
9) On the left side of the screen, you will be able to see the list
of programs installed on the VM, and on the right side of the screen, you will
be able to see the list of programs visible in the Applications Menu.
10) Select the installed program from the “Available” tab.
11) Click on the “>” icon.
12) Click “OK” to save the settings.
13) Done, now you will be able to access the program from the
Applications Menu of the Whonix VM.
Keep in mind that you should only install a safe software in the Template VM, because if the Template VM gets infected, then all the VMs based on it, will also be infected.
 BACK TO TABLE OF CONTENTS
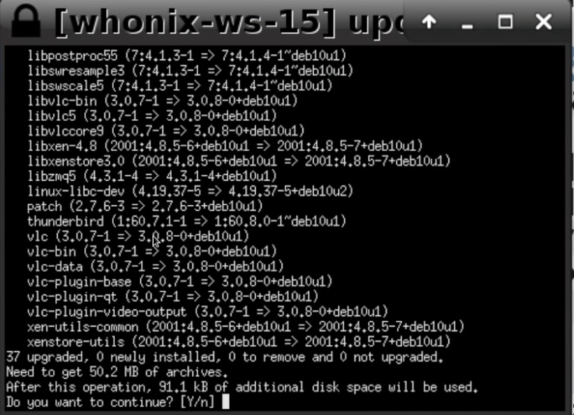
Updating Template VMs is a very crucial part of Qubes OS, because if the Template VM is outdated then it will affect all the AppVMs based on it.
Follow the steps below to update a template VM:
1) Open qubes manager.
2) Right click on the Template VM.
3) Select “Update Qube”.
4) Now it will start the Template VM, and it will also the start the
updating procedure of the Template VM.
5) In between the update it might ask you
for a confirmation, type “y” and then press [ENTER] to confirm it.
6) Once the installation is complete, shut down the
Template VM.
7) Now the Template VM has been updated, and we are
ready to use the AppVMs based on it.
Note: Keep updating the Template VM from time-to-time.
 BACK TO TABLE OF CONTENTS